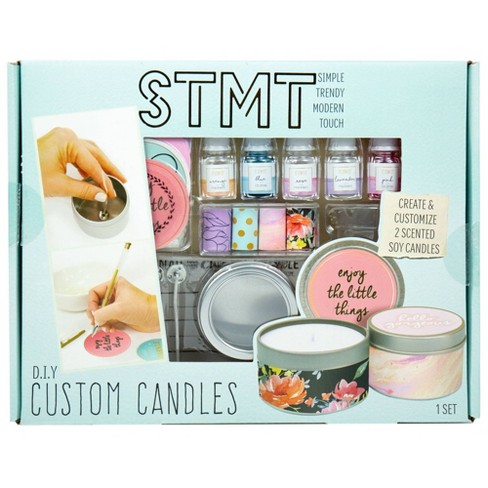
Hi guys! I recently got the STMT DIY Candle Kit for Christmas, and I’m here to tell you all about it! The positives, the negatives, struggles, and successes will all be included! STMT is a great brand, so my expectations for the kit were pretty high! I HAVE tried other kits by STMT, and I’ve always felt that STMT is a go-to gift idea for my friends as well. This kit was a fun experience, but it definitely wasn’t perfect! Keep reading to find out more about it!

First of all, the price point- is it a good deal? Most places sell the kit between $17 and $20, so it’s around the same range as the other STMT kits. Is the price fitting for THIS specific kit? Well, if you get into the nitty-gritty details, then you may believe that the kit’s price is a little high for what’s given, but that’s a common theme for the STMT kits. It’s really about the experience, and not about the kit ITSELF. The BIGGEST thing that mad me question the kit’s price point was how MANY candles you can make. The kit only makes two candles! I know what you’re thinking, it’s a kid’s craft kit, they can’t be giving you an entire candle factory, but I still feel like the entire set could have been composed a little better!

What’s given?- The candle kit includes the wax for the candles, two candle wicks, two candle tins, a measuring cup, stickers for the sides and the lid, a gel pen, stirring sticks, 3 fragrances, and two colors. The colors that come with the kit are blue and pink. The fragrances are jasmine, rose, and orange. First, let’s talk about the wax. When I first opened the kit, I was surprised at how much wax there was. I assumed that you could make many candles with how much candle wax was given. I was kind of shocked when I found out that we needed THAT much wax for just two candles, but after melting it, it made MUCH more sense. (I’ll get into more depth about that later…) Next, let’s talk about the tins and the stickers for it. The tins were a little too small, but again, the kit wasn’t made for creating Bath and Bodyworks quality 🙂 The stickers were really pretty design-wise, but for some reason, the sticker that was meant to go around the tin wasn’t wide enough to cover the width of the tin. In the end, I don’t think that the exposed tin looked bad, rather, I thought it added a little modern touch, but the only thing that was annoying was that the way it was advertised, it showed that the entire side area of the tin was covered. Next, I thought the fragrances were GREAT! They all smelled AMAZING, but my favorite was definitely rose. And finally, the colors. I wish that they would have given us more color options, because the only colors given were pink and blue. Don’t get me wrong, I love both of those colors, but just having more choices by giving primary colors would be great!

The experience- Enough about the kit, let’s talk about the experience! The first step of the process is to glue the candle wick down with hot glue, which is a step that could be a roadblock for many users, since the age group that this set is meant for might not even own something like a hot glue gun…Luckily, I had one, so I was able to glue the wick down. Next, you had to get into the TRUE candle making. We had to get a microwave-safe bowl, and melt half the bag of the wax chips in the microwave for about 5 minutes. The bowl was BURNING hot after I pulled it out, even though I put it through intervals. The melting itself wasn’t difficult, but you’ll notice that the amount gets significantly less when you take the bowl out. Half a bag is the perfect amount for the candle. The next step was to mix the fragrances and color into the wax. I used blue and pink to create a dark purple color, and added lavender and rose fragrance to it. This step was definitely the most fun part! One issue with this part would be that the instructions tell you to pour the wax into a measuring cup first, add the fragrance and color, and THEN pour it into the tin. I had to repeat this about 4 times. This was a bit tedious and messy, so a good improvement would probably be to give a larger measuring cup so the entire wax mixture could go into it. Maybe even providing a microwave safe measuring cup would be very helpful. The last steps were to let it dry for 30 minutes, and then add the stickers. The stickers had some really cool designs and I chose the purple set for my candle. One thing to keep in mind if you plan on buying this kit would be that the stickers for the lid of the tin are made of paper, and the backing is too. Be careful when removing it, because it might rip. The sticker backing is also a little difficult to remove, so I recommend using gentle methods to remove it.

Do I recommend this kit? Of course! As I mentioned earlier, STMT kits are really about the experience, and I would definitely say I had a great time. My candle turned out really aesthetic, and I’m really excited to try it out! Thanks for reading this post, and HAPPY NEW YEAR!!!!


